“My feet, arms, and legs are so sore,” I tell my wife over dinner. She laughs and tells me I haven’t left home, gone to the gym, or done anything other than write and play VR games the past few days. “I know,” I tell her. “That’s the point.”
Playing roomscale VR games is exhilarating, immersive, and downright exhausting. Punching discs back and forth in games of Ripcoil, reaching the far corners of the room for hours on end to put the tracking sensors through their paces, ducking and crouching during shootouts in Dead & Buried, killing hundreds of zombies in Arizona Sunshine, and trying to set a new home run record in VR Sports Challenge — these are all things that feel real when you do them in VR.
After spending over a week putting the Oculus Rift with Touch through its paces, and re-testing many aspects of the HTC Vive itself, I’ve come away a more conditioned, sore, and seasoned gamer than I was previously. Obviously I’ve spent a lot of time in VR before this, but it’s usually much more sporadic and with lengthy breaks. This past weekend, I may have spent just as much time in VR as I did doing anything else.
For reference, here is our original Oculus Rift review, HTC Vive review, and Oculus Touch controllers review.
The HTC Vive originally released back in April of this year. From day one, it has enabled keyboard and mouse, gamepad, or motion controllers for input methods, as well as seated, standing, and roomscale tracking in your play space. The Oculus Rift, by comparison, released a few days earlier, but only permitted keyboard and mouse, gamepad or a simple remote input method, as well as seated or standing tracking. There were no motion controllers and no roomscale options at all. That’s all about to change.

What is Roomscale VR?
You might be wondering what exactly is roomscale VR? Essentially, roomscale tracking means that you’re able to move around an entire room freely, without the game, headset, sensors, or anything else losing track of your location. This means turning around and walking away from your computer, crawling on the ground, reaching up in the air, crouching behind something in the virtual world, and any other type of free-form interaction. This has been a feature of the HTC Vive since day one.
Conversely, with the Oculus Rift you could stand or sit in front of your single camera while it tracked your headset, but that’s it. If you leaned over too far, the camera would lose track of you. You couldn’t move laterally across the room or do anything other than remain stationary with slight head movement. It was still an immersive virtual reality experience, but was far from the fully-capable roomscale immersion that many people were yearning for.

How Does Roomscale VR Work?
The HTC Vive enables this through the use of its lighthouse base stations. They work by invisibly sweeping lasers across your entire room and tracking the headset and controllers by way of the little concave sensors you see spread across the surfaces of the devices. In order to use the Vive at all, you set up a base station up in each opposite corner of your room. This allows them to see and track the full area, in real-time, regardless of what you’re doing or which direction you’re facing.
Until now, the Oculus Rift wasn’t really capable of matching this feature. But with the flexibility afforded by multiple Rift sensors on the same setup, that’s starting to change. When you purchase the Oculus Touch controllers for about $200, they come with a second sensor. This expands the trackable space laterally, as you place them on opposite sides of your desk. Now you can reach out with your hands, and move around your room a bit without having any real issues. However, even then, it’s still a mostly 180-degree experience. Turn all the way around or go too far to either side and the sensors will lose track of parts of you eventually.
But if you get a third sensor and enable the Rift’s “experimental” roomscale tracking, then you can finally access true roomscale. A third sensor is available for approximately $80 before tax and shipping and it includes a 5 meter extension cable. You place this third sensor at the back of your playspace, which enables it to see you when turned around, and can access up to an 8×8 feet space. This is still much smaller than the ideal maximum of the HTC Vive.
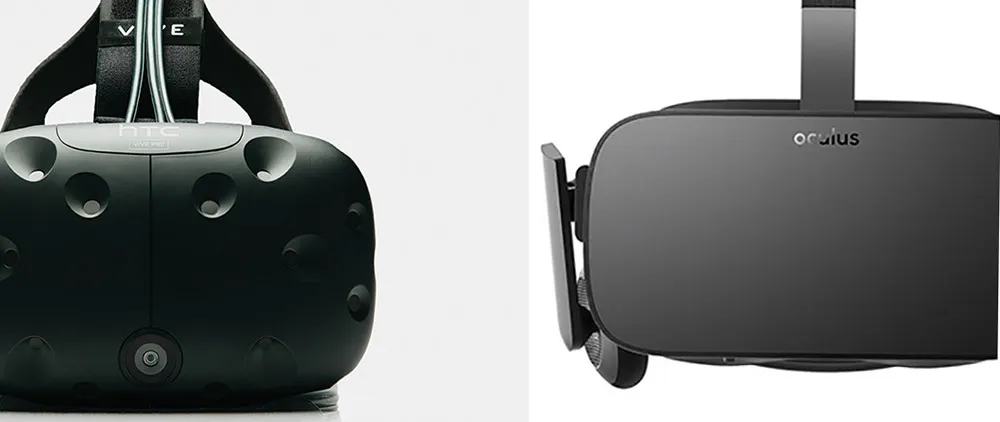
This comparison — the complete HTC Vive experience vs. a Rift with three sensors and the Touch controllers — is the primary focus of this article. If you want to know what we think about the Touch controllers vs. the Vive controllers, then you can read that here. Spoiler: we like the Oculus Touch controllers better.

Roomscale Setup: Vive vs. Rift
When setting up your roomscale environment, the Rift and the Vive differ quite a bit. For the Vive, you plug your headset into the breakout box with clearly labeled ports, then plug that box into the back of your PC with a USB port, an HDMI cord, and then into a power outlet. That powers your headset. Make sure your controllers are charged up, then set those aside. Now you have to place your lighthouses, above head level, in opposite corners of the room. It can be a bit tricky depending on what’s in the room, but they can be easily wall-mounted, which is recommended for stability and accuracy. Just angle them downward toward the center of your room and you’re good to go. All they require is a single power outlet for each. For inevitable firmware updates, you’ll have to plug devices into your PC directly.
Now you go through the SteamVR setup process, including the room setup, which will allow you to set the floor orientation and outline the trackable environment by walking around the perimeter of your room. Once you’re done, everything should work well. The thick wire that goes from your headset to the breakout box is frustrating, but you get used to it eventually. To make sure you did it all correctly, I’d highly recommend reading the official documentation.

For the Oculus Rift with three sensors and the Touch controllers, we found setup to be a bit more complex. For starters, the Rift itself plugs into the PC in a very similar fashion — with a USB port and HDMI cable. Then you’ve also got to plug in both — or in the case of roomscale, all three — of your tracking sensors. Instead of using power outlets, they must each go into a USB port. This means a lot of cords and at least one USB extender for that pesky third sensor in the corner. It also means getting out a tape measure to make sure your playspace is setup correctly, which can be frustrating and lead to rearranging furniture. The default presentation of each Rift sensor is on a short stand with a platform at the bottom, rather than the lighthouse’s cube design, which is more adaptable for mounting.
Once everything is plugged in, the setup process that the Oculus SDK walks you through isn’t fully functional for a three sensor roomscale setup, which resulted in us skipping some steps because it wasn’t registering things correctly all the time. Luckily, it all worked fine even after skipping those. If you want to run Steam/Vive games with the Rift and Touch, then we recommend going through the Oculus SDK setup process first, then launching Steam VR and running its roomscale setup afterward. You can read the official documentation here about the experimental tracking.
In both cases, the setup process isn’t simple and has a lot of steps that could get messed up or take well over a half hour to an hour to get everything right. I hope you started downloading games and apps before trying to set either headset up. Ultimately though, the Vive setup process is easier, with less cords, and more flexibility.

Roomscale Size: Vive vs. Rift
Our Vive-powered mixed reality capture studio at the Upload Collective is a fairly large space of approximately 8 ft. x 13 ft. The minimum play space recommended on the product website is 6 ft. 6in. x 5 ft. with a maximum of 11 ft. 5 in. x 11 ft. 5 in., however we found expanding as far as 13 ft. in either direction was supported during testing. The only bottleneck in this was was really the range of the base stations and, to a lesser degree, the length of the cable.
With the Vive, since the headset cable connects to a breakout box that then connects to an outlet and your PC, the permitted length that your headset can extend is quite lenient. Whether we were rolling on the ground, walking the full length of the entire play space, or even standing on chairs to simulate extreme height, there were never any issues with tracking. The same goes for a smaller, minimum-sized roomscale setup for Vive.

The Oculus Rift roomscale size has a few more variables. When using two sensors, the Rift asks you to set them up anywhere from 3-7 ft. apart, on your desk, in front of your monitor or wherever you want your front-facing orientation to be. For most people, that will be on either end of their desk. But when you add a third sensor into the mix, it gets a bit more complex. Now Oculus recommends those first two sensors to be approximately 8 ft. apart, and the third should be 13 ft. away from the left sensor, in the diagonal corner of the room. This will permit an 8 x 8 ft. playspace, which makes the recommended maximum for Rift with Touch and three sensors just a couple of feet larger than the recommended minimum for the Vive.
However, we found that this space limitation is mostly artificial. By spreading that third sensor out farther and moving the two main sensors a bit further apart, we were able to get closer to 9 ft. or 10 ft. tracking in either direction. The limitation here being the cords themselves and the range of the sensors. The optimal tracking space occurs in the center of the play area, so just because you can expand the camera distance doesn’t necessarily mean the tracking will be as effective throughout the room. Keeping it to the recommended space will afford the best results.
The most frustrating aspect is, once again, the cord length. Since the Rift has to plug directly into the PC without a breakout box, wrapping around to the back of most towers to get to USB and HDMI, you’re already shrinking the cord length as a result, plus it’s shorter than the Vive’s already. Even though the third sensor could be moved a bit, we found that anything farther than 9 ft. away from the tower wasn’t plausible. Plus, the third sensor needs an extension cord to even reach that far.

Roomscale Tracking: Vive vs. Rift
But the real question — regardless of tech tech, setup process, or room size — is how well does it work? In the case of the HTC Vive, it’s about as flawless as we could expect. Since the base stations bathe the room in lasers over and over to track the controllers and your headset on a consistent basis, it hardly ever loses track of where you are. They’re elegant, simple, and effective. Plus, you never need more than two to cover the entire room itself.
The Rift on the other hand is bit more finicky. Once the sensors are in their ideal places, perfectly angled, and at exactly the correct recommended distance, everything works the same as the Vive. It tracks movement around the room, we were able to lay on the ground, stand on chairs, and do pretty much anything we’d ever need to do in a roomscale experience. The added sensor all but eliminates the possibility of occlusion for either of the Touch controllers.
But the sticking point here is once they were set up perfectly. It’s more difficult to mount the Oculus sensors, and any variation in height or angle seemed to really throw a wrench into the entire process. When it works, it works, but it required jumping through a few more hoops to get there.

Final Verdict: HTC Vive
Ultimately, if you’re looking for the better roomscale VR experience, then the HTC Vive is still the way to go. Setting aside the content questions (the Rift enables both Oculus Home and Steam VR games and applications, the Vive is limited to just Steam without a hack) and just focusing on the roomscale capabilities renders a clear edge to the HTC Vive, even after the Touch controllers are out and you purchase an extra sensor on top of that. For Vive, you get it all for $799. For Rift, you need the headset ($599), the Touch controllers and second sensor ($199) and a third sensor ($80). That comes out to approximately $100 more for a comparable, but still slightly inferior, roomscale experience.
The frustrating cord length, abundance of USB ports and extra cables, added price tag for a third sensor, and finicky tracking precision all add up to the Oculus Rift still not quite measuring up to the relative ease and simplicity of roomscale VR through the HTC Vive. It’s also worth noting that the entire prospect of roomscale VR was something that HTC coined with the creation of the Vive and for a piece of technology that wasn’t and still isn’t primarily designed to offer such an experience, the Rift is more than capable.
The experiences are now very close to one another, though, and the Touch controllers are better devices as a whole, but we still prefer the Vive’s lighthouse base stations over the Rift’s camera sensors. The HTC Vive should be your choice to enable VR in larger rooms with its less expensive system and simpler setup. But the Rift still offers a great roomscale experience, especially for smaller or medium-sized spaces, plus a better input solution with the Oculus Touch controllers.
What has your experience been with the HTC Vive and Oculus Rift in roomscale VR environments? Which headset do you prefer? And which controller do you think is better? Let us know in the comments below!