I’m at the bottom of the ocean, a small flashlight in my hand providing the only glimmer of light in the middle of the dark abyss around me.
Shining it around I am able to get a better glimpse at the carcass of a giant whale towering over my head. A speck of blue light appears in the distance as I walk over to get a better look – a bioluminescent jellyfish, gracefully gliding upwards toward the surface. I reach out and touch it, shifting it slightly off course as hundreds of other jellyfish fill the scene, casting a beautiful blue hue over the sea floor.

I stand there in silence, awestruck by the beauty of the moment, drifting mouth agape through the wonder of nature surrounding me. It was an impossibly beautiful moment made possible only with the HTC Vive.
Like those steps into the abyss, the HTC Vive asks consumers to take a leap of faith. Virtual reality is a brand new medium and the Vive’s $800 price tag makes it the most expensive ticket to the circus. For those who are willing to take the plunge, however, the Vive offers the most immersive virtual reality experience you can get in your home today.
Table of Contents
- Hardware
- Software
- Final Thoughts
Hardware
https://www.youtube.com/watch?v=-Z3JeTAt03c
Setup
The setup for the HTC Vive can be fairly simple or slightly involved depending on how you decide to configure the device.
The headset is tracked by a pair of ‘lighthouse’ base stations that sweep infrared lasers across the room at 120Hz. These lasers are picked up by the sensors on the headset and controller, allowing it to be tracked in 3D space. Only three sensors need to be visible at any time in order for the device to be tracked, meaning that it will work with a variety of different setups – including using only a single lighthouse tracker (though this is not an ideal setup).
The Vive offers a pair of options when setting up your room – “Room Scale” meaning a trackable space ranging from 2m by 1.5m to 5m by 5m (and potentially even bigger) and a “Standing Only” setup for those who don’t have enough space for Room Scale. In order to get the most out of your Vive, however, you are going to want to clear out enough space for room scale – especially as some applications have room size requirements tied to them.
We experimented with a number of different setups in different environments and found that the lighthouses were very flexible. Ideally you want them placed in opposite corners. However, setups with both devices facing forward, such as placing them both on your desk, also will work – with varying degrees of fidelity.

For my setup I mounted the lighthouses about 2.4m off the ground with the included mounts in opposite corners of my living room. (In case you are wondering – a lighthouse can survive an impact on a hard surface from at least 8 feet. I know this because I, uh, tested it several times.) I set them about 5.69 meters apart (which is slightly further than recommended) and angled them each at about 30 degrees downward. Moving my coffee table and a chair out of the way I cleared about 3m x 2.1m of playable space in my living room. Making some minor tweaks after nearly putting a hole in my TV once or twice I ended with a 3m x 1.9m space with a couch and desk chair at the two of the outer edges of the playspace, making them easily accessible for seated experiences. (Pro tip: with this setup it helps to turn off the chaperone bounds when you sit down.)
It is worth noting that intermittently, with certain setups and locations, I ran into issues where the lighthouses would lose optical sync. The issues do not necessarily seem to be tied to distance because they happened both inside and outside the threshold of the maximum distance set by Valve and HTC. It was not an issue that I experienced during my extended time with the Pre either. I was unable to replicate the issue on a consistent basis and it was usually solvable using the sync cable. Setups that typically failed did have a lot of ambient light, but speaking with developers that has not been an issue for them so the mystery here remains. For what it is worth, the setup in my living room is currently working flawlessly.
Now, having this much playable space is great – but it does require you to move things around in your room every time you want to utilize it (unless you have an empty room dedicated to VR), which can be a bit of a hassle, but the experience is often worth the extra effort.
Once you have set up your lighthouses, the rest of the setup is pretty straight forward with a software install process that takes about 30-60 minutes depending on your computer and internet speeds that also guides you through getting the device hooked up. Setting the device up across multiple machines I ran into occasional random hiccups, but typically a simple rebooting of SteamVR fixed any issues I had at the outset.
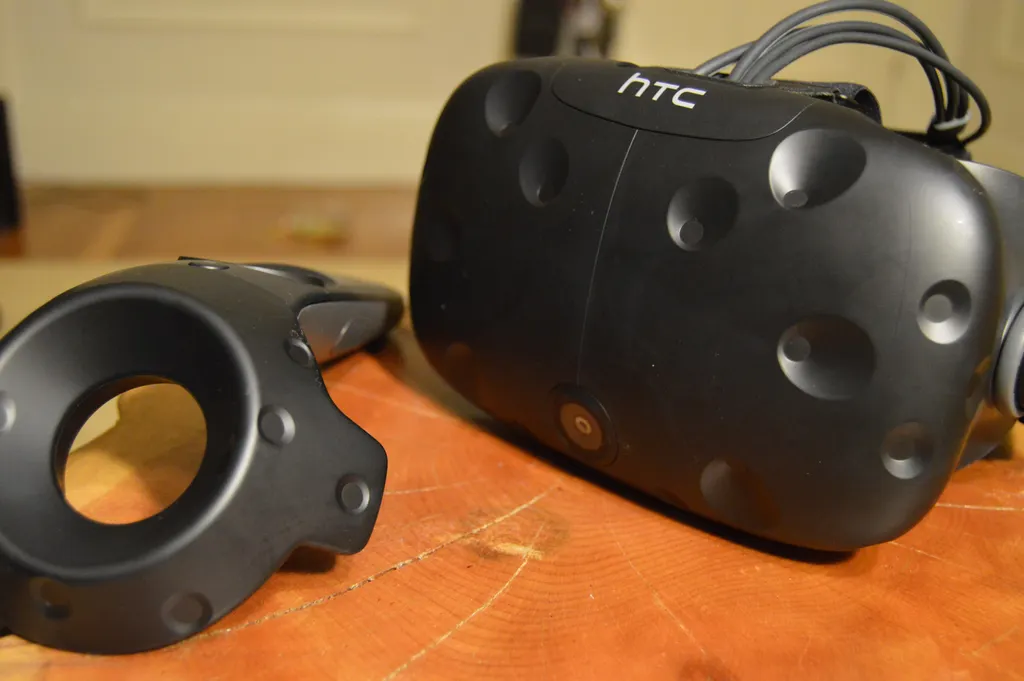
Headset Design and Ergonomics

If HTC was looking for a sleek, mass audience appeal in the design of the Vive, then they may have slightly missed the mark.
The device looks a bit bulbous on your face, and the pock marked sensors on its face give it a bit more of a cyberpunk feel when compared to the Oculus Rift. Still though, it is a big improvement from the development kit days, and despite being bulky the HTC Vive is fairly comfortable – after you get the right fit on your head. That said, I did find that it began to feel a bit forward heavy after extended play sessions making it less comfortable.
Getting the right fit
Core to getting the best experience with the Vive is making sure the fit is right. The first time you put on the headset, you should give yourself some slack on the straps, and adjust the fit from on your face. You should tighten the sides as much as possible without feeling like the headset is squeezing your face (this is how you end up with ‘VR face’). The triangular back of the head strap should rest on the crown of your head flat and the top strap should be tightened enough to lift the the device up slightly, relieving some of the front heaviness. Once the straps are properly adjusted, shift the device slightly around on your face to get the clearest image.

One nifty feature on the headset itself are the ports on the front. Sliding off the piece of plastic covering the cords entering the headset exposes an extra USB port. The port is powered meaning that you can use it for accessories like the Leap Motion. HTC provides a handy angled USB extender that fits snugly alongside the other cords coming out of the headset. We tested a Leap Motion with the port and it ran well – though we had to jerry-rig a mount for the device because of the curved front of the Vive.
In addition to hiding a USB port, the port cover reveals the onboard audio jack. The HTC Vive comes with a set of headphones as well as an auxiliary port extender that places the audio jack approximately at the back of your head (kind of like jacking in in the Matrix). The headphones that ship with the Vive are fairly standard ear buds, with decent sound, but have a much shorter cord than your typical set. I get what they are trying to do with the headphones, the short cord is meant to provide less clutter, but I found the short cord got snagged a bit more easily and had less give – yanking the headphones out of my ear. Thankfully the onboard audio jack lets you easily connect your own headphones to the headset, which I chose to do.

In addition to the ports, the headset also allows you to easily adjust the IPD with a dial on the right hand side of the front of the device. When you twist the knob it allows you to adjust your IPD from 60.9mm to 75.5mm and displays the current distance overtop of your experience. There also is a way to adjust how far or close the lenses are from your eyes making it more comfortable for those with glasses or long lashes, but at the expense of some of the perceived field of view.
I typically took my glasses, which are on the larger side, off while using the headset, but found they could fit inside the headset with relative ease. Testing with a second, smaller, pair of glasses resulted in a more comfortable fit, but given the option I chose to not wear mine inside the headset.
Out of all three of the major VR headsets (Oculus Rift, HTC Vive and the PSVR) the HTC Vive is probably the least comfortable and ergonomic, but not by an experience-defining margin. Choosing function over form, the HTC Vive’s headset feels well-designed and relatively comfortable, but it does leave room for improvement with future generations.
Display and Optics

The Vive’s display is vibrant and crisp with a 1080×1200 per eye resolution and an approximately 110-degree field of view. The display feels somewhat tuned to the dynamic range, as blues felt especially vibrant, whether it was staring at an Angler Fish’s light at the bottom of the ocean or a blue giant star in Universe Sandbox. Scenes with vibrant colors tended to stand out best with the Vive’s bright display, however it is also capable of a dynamic range of contrast and deep blacks as demonstrated in WEVR’s The Blu: Luminous Abyss.
Using specially designed optics, the Vive is able to help correct for the ‘mura effect’, making the display much more clear. This helps objects and text appear sharper and less murky. Despite being incredibly clear, the optics aren’t without their minor flaws.
The Vive uses fresnel lenses with pronounced concentric circles that make up the different layers of the lens. These layers allow the light to focus toward the center and act as magnifiers for the image. Fresnel lenses allow the Vive to have a wider ‘sweet spot’ on the lens where the image is focused, but also have the drawback of being visible in certain situations – such as a white mountain against a blue sky in Everest.
The visible rings were exceedingly pronounced during sporting games like VR Baseball or Cloudlands Mini Golf that had my eyes looking toward the edges of the lens to see the pitch or the cup. The picture at the outer edges of the lens was highly distorted, forcing me to turn my head to make out the ball/cup. For me, the circles are a bit of a ‘once you see them you can’t unsee them’ kind of thing but they fade into the background for the most part.
The display also has a little bit of a screen door effect still, however, it typically isn’t visible unless you are really looking for it. Usually it is most visible on scenes with a lot of white.
Controllers

One of the things that truly separates the Vive from other VR devices are the two hand tracked controllers that come with the device at launch.
Redesigned from the first development kit to feel more balanced and comfortable, the two Vive wands fit nicely in the hand with an angled slope that proceeds to a top-heavy sensor doughnut. For games that use a gun (or similarly held object) the controller feels just about perfect, down to the top heavyweight. However, this does not necessarily translate to every experience. Playing The Gallery: Call of the Starseed, for example, I was acutely aware that I was holding wand shaped controllers where my hands were represented in the game. In cases like that, it took me a step away from full hand presence.
That said, finding an input solution that feels right for every experience is nearly an impossibility at this point (at least until we figure out how to input signals directly into the brain) and the Vive wands feel like a perfect solution for many of the games we played.
Camera

The Vive’s outward-facing camera it turns out is also incredibly useful. At CES this year, Valve and HTC showed off the camera’s “Tron Vision” that displayed a computerized vision of the real-time scene outside of the headset.
This view acts as an extension of the Vive’s chaperone bounds and can be very useful for grabbing a glass of water or finding a chair to sit down in.
However, there is a bit of a downside in setting it to your chaperone bounds, it really breaks the immersion of the scene. If you are in a smaller playspace especially it is probably best to turn off the chaperone camera unless you want to be staring at a transparent overlay on top of your scene the whole time – the bounds can be fairly sensitive.
In addition to Tron Vision, the camera also has a direct feed pass through that you can see in the dashboard menu. A view window is attached to one of your controllers acting as a conduit into the real world. This is incredibly handy for seeing your keyboard in seated experiences, for example.
The camera’s uses may grow beyond these two cases in the future with developers having access to it through the SDK. One potential use case we may see in the near future is the ability to automatically map the bounds of the room. Rather than tracing the boundaries with a controller, the camera could eventually be used to define boundaries on the fly.
Software
SteamVR and UI
In order to facilitate a smooth user experience a lot of work has gone into refining the UI on the Vive – which is both intuitive and highly functional.
A press of the System button brings up a dashboard with three different viewing options – Steam, Desktop and Vive – all navigable using the controller as a laser pointer, the trackpad to scroll, and the trigger to select. This dashboard can be pulled up at any point and pauses games by default, greying out the virtual world around you allowing you to switch experiences on the fly.
The Steam function gives you access to everything you have in the Steam desktop client including the full store and a web browser. Out of the three modes this was the one we used the most. Desktop mode is a simple mirror of your desktop in space, while Vive appears to be the start of a potentially broader UI redesign that includes a navigable 3D space (that may potentially house trophies and achievements from games). This UI space feels somewhat unfinished at this point, landmarked by the words “coming soon” over the tauted cell phone integration UI.
Within the dashboard you are also able to tweak a few settings, such as editing the type, color and opacity of the chaperone bounds, changing your default environment, and turning the camera’s functionality on and off.
All in all the UI seems to be designed around keeping you from needing to take off the headset at any point – allowing you to flow quickly and easily between tasks and (eventually) check in with the real world as well.
Content

The Vive’s content library is fairly vast with 69 VR titles available in the Steam Store at launch, more than twice what was available in the Oculus Store. However, quantity doesn’t always equate to quality, there are a lot of experiences that are still in a demo or early release stage that are a bit rough around the edges.
One of the reasons that many people will buy the Vive is its ability to do ‘room scale’ experiences with hand tracked controllers right out of the box, but about a year ago when the Vive was first announced the only people who had even heard the term either worked on the Vive’s team or were part of a select group of developers chosen in its pilot program.
The point is that there simply hasn’t been enough time to allow rich, lengthy, and deep room scale experiences to be created for the Vive. That said a there are a large enough number of shorter, highly polished room scale games and experiences to sate the appetites of any early adopters. Experiences like The Gallery and Job Simulator showcase the power of worlds with large amounts of complex interactivity. Hover Junkers delights with a take on the online multiplayer FPS genre built around the restrictions of VR locomotion. Unseen Diplomacy rewards anyone with a space large enough for it with a totally unique experience that could only be accomplished with this particular brand of VR.
https://www.youtube.com/watch?v=pZSaYcpT8UY
Despite these many early gems, however, none of the launch titles have the length, depth and complexity mixture that one would associate with a AAA-level title.
In the place of those types of experiences are a number of shorter, and highly addictive arcade style games that keep you coming back and, perhaps most importantly, offer an outlet for local multiplayer. Experiences like Space Pirate Trainer, a game where you have to fight off endless waves of drones with laser pistols, are quick enough to set scores and challenge your friends in the room (thereby letting everyone in on the fun) and hit the right triggers in your psyche to keep you coming back for “just one more try.”
Beyond the arcade titles the Vive’s catalogue is filled with non-gaming experiences as well. Tilt Brush, for example, is already opening the door to a brand new way for artists to create – and as Disney animator Glen Keane showed us, it may take on an entire life on its own. WEVR’s The Blu, which is an extension of one of the first demos on the platform, transports you into amazing underwater worlds that will steal your breath away.(Seriously, if you have a Vive or access to one, do yourself a favor and check out Luminous Abyss) while Innerspace’s La Peri pushes the interactive narrative to a new level of beauty.
Overall there is a lot of really high quality content on the Vive, even if a lot of the experiences that kept me coming back again and again were more on the arcade side of things. The fact that so much of it is available only one year after the platform was announced bodes well for the future of the device as well.
Final Thoughts

What Valve and HTC have accomplished in the last two years of working together is nothing short of astounding. While the Vive, like its face, is peppered with the small pockmarks and imperfections of a maturing platform – it represents a leap forward into the future direction of VR.
Whereas the Rift’s launch is focused on bridging one medium to the next, using a gamepad controller for all of its early titles, the Vive is focused on charging headfirst into virtual reality’s future.
The Oculus Rift proves you don’t need room scale and hand tracked controllers to have some impressive VR experiences, the Vive showcases just how much you are going to want them. For those who are looking to invest in VR early, have the space, and don’t mind the $800 price tag – the Vive is an absolute must buy. It may not have quite the same level of consumer polish or comfort as the Rift, but the HTC Vive is the total package that virtual reality enthusiasts are looking for.