Need better gear in A Township Tale? Then you’ll need to visit the Blacksmith. Get started with our A Township Tale Blacksmith guide!
Where Is The Blacksmith In A Township Tale

Like a lot of areas of the game when you first start out, the Blacksmith is actually locked. To get access, you need to donate resources into a box off to the left of your town when you first enter it. Meeting the requirements will build a set of stairs you can take up to the Blacksmith.
How To Unlock The Blacksmith In A Township Tale
Specifically, the Blacksmith requires 200 chunks of wood and 25 clumps of dry grass. The grass is easy – you can find plenty of it where you first spawned in the map and also in front of the mines, which you can find by following signs and heading uphill at the back of the town.

Wood chunks are harder to come by, as you need to unlock another area first to find trees you can chop. Before you enter your town, you can find another resource box off to the left, under the arch next to a river. It asks for 250 sandstones to build a bridge. You can get sandstones in a few locations, but it’s best to start with the rocks immediately around you. Make sure to mine the yellow-ish stones, not the grey colored ones (those are normal stones and can’t be used). Don’t forget you can make a simple pickaxe very quickly by finding flint on the floor around the edges of town and attaching it to a twig from a tree.
If you need more sandstone, turn around, head up the hill opposite the box, take a right up another hill until you reach an enclosed area with lots of stones.
Once you’ve mined this area, you’ll probably need more sandstones. You can get some from mining rocks outside the mines. Once you’ve gathered 250, head back to the box and drop them in to build the bridge. From here, walk directly over the first field, cross another bridge and you’ll find some of the first trees to properly chop.
You’ll need a good axe to chop and proper process – don’t just waggle your hands but make good, strong swings. Thick logs turn into chunks whilst branches split into twigs. There are also tree-like enemies here that will turn into chunks upon defeat too, though their ranged attack hits hard so don’t just dive into combat. You might need to make a few trips for supplies, but you’ll eventually get enough wood to drop in and make the stairs to the Blacksmiths.
How To Use The Blacksmith And Make Ingots In A Township Tale

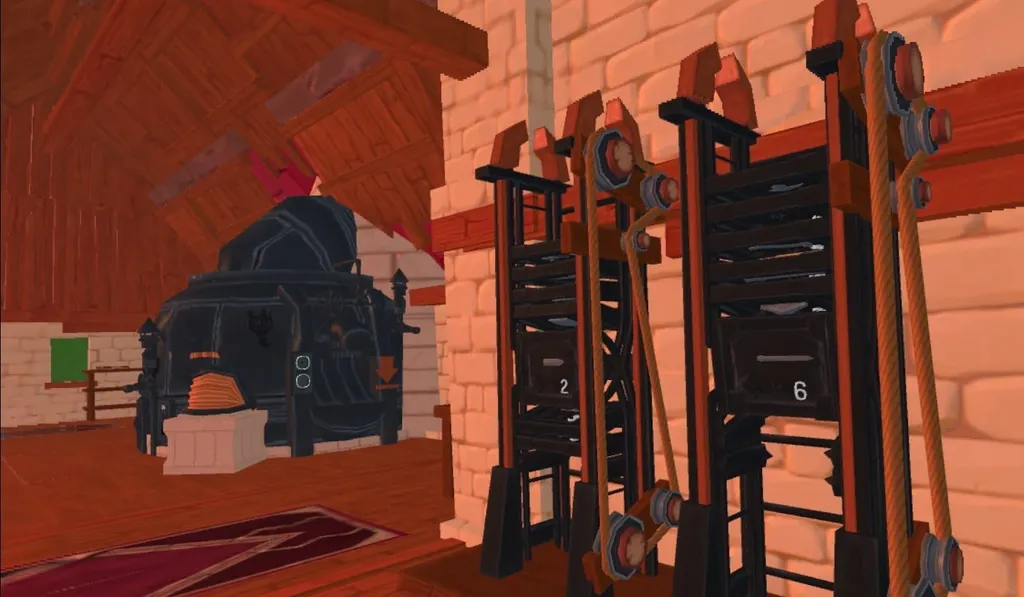
There are two main parts to being a Blacksmith in A Township Tale. Firstly, there’s the process of turning metal ingots into the right shape of weapon or tool, and then bashing the end result into shape using a hammer and the furnace.
First, to make ingots, you need ores. There are several types of ores in the game, starting out with common copper ores and graduating to iron and other types later on, but we’ll start with these two. A certain amount of ore will give you one ingot. To make an ingot, you need to empty your ore into the dish on the upper left side of the furnace inside the Blacksmith. Next, head to the middle of the machine and put in either wood chunks or twigs as fuel. With fuel inserted the process of turning ores to ingots should start automatically, but you can speed it up by operating the fan to the right of the fuel area. As they’re completed, ingots will drop into the trough to the right of the furnace.
When it comes to weapons and tools, you’ll need molds (more in that in a second) which will produce a thick version of your desired item. Take that out back to the fenced area and throw it into the forge. Eventually, you’ll see it start to sparkle with gold streaks. Retrieve it and then use a hammer to bash the tool or weapon into shape. It’ll start to thin out and you’ll eventually see the sparks disappear when the item is complete (you might need to reheat it one or two times depending on the quality of your hammer and your skill with one). After that, it’s just a case of attaching your tool or weapon head to a handle.
How Use Molds To Make Weapons And Tools Via The Blacksmith In A Township Tale

You can’t just immediately start making swords and arrows once you’ve found the Blacksmith. To know what you want to make, the Blacksmith needs the corresponding mold. You’ll find molds at random out in the world – largely in chests and crates hidden down in the mines and in other areas you’ll unlock as you play. They’re large, square slates that depict the item they create and the number of ingots needed to forge them. Every time you find a mold make sure to safely stash it in your inventory (if you have space) and bring it back to the Blacksmith, where you can store it at the back of the room. If you run out of rack space, you can build more. You can also find more than one type of the same mold, so make sure to remember which you have already.

When you want to make a certain type of weapon or tool head, grab the corresponding mold and place it in the designated area on the left of the furnace, near where you pour in the ores and ingots. You can use any type of ingot to make any type of weapon, but different metals provide different properties. Making a copper sword is a good start, for example, but eventually, as you reach deeper into the mines you’ll start finding more iron, which produces sharper and more durable blades. Make sure to put in the exact amount of ingots the mold requires, otherwise you might waste some or make more of an item than intended. After you’ve made the item and bashed it into shape, you’ll need a handle to connect it to.
If you don’t have one of those to hand, you’ll need to fashion one with carpentry. That’s a whole different kettle of fish.
How To Make Weapon And Tool Handles Via Carpentry In A Township Tale

Carpentry isn’t quite as complicated as the Blacksmith, but it does still require some exploration and skill. To carve a handle, you’ll first need to find its instruction page. Much like the molds, you’ll locate these out in the world. The beauty of pages, though, is that you just need to pick them up and let them go. You’ll then see an animation, indicating the page has been added to the corresponding book back in town. Once you’ve found some handle instructions, head back to the Carpentry building.
Find the book under the stairs, find the page for the desired tool and rip it out. Then place it in the holder next to the work bench. It’ll tell you how many chunks of wood you first need to put into the holder, which will start to form one larger block. Once you have enough wood, it’s time to chisel.
Though you can get dedicated tools for chiseling (you might’ve found a rusty chisel somewhere), you can also just used a piece of flint and a basic twig/rock combo for a hammer. You need to angle the chisel as indicated and hit calmly and smoothly. Hit off the mark too much and you might end up making something entirely different.
Did you find our A Township Tale blacksmith guide helpful? Did you miss anything? Let us know in the comments below!